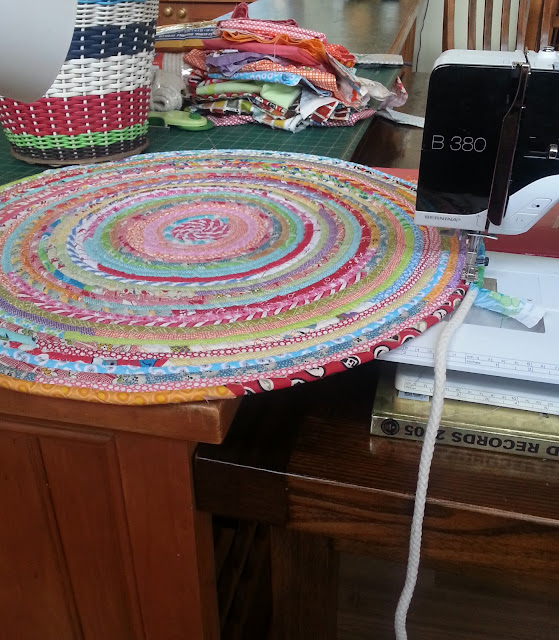
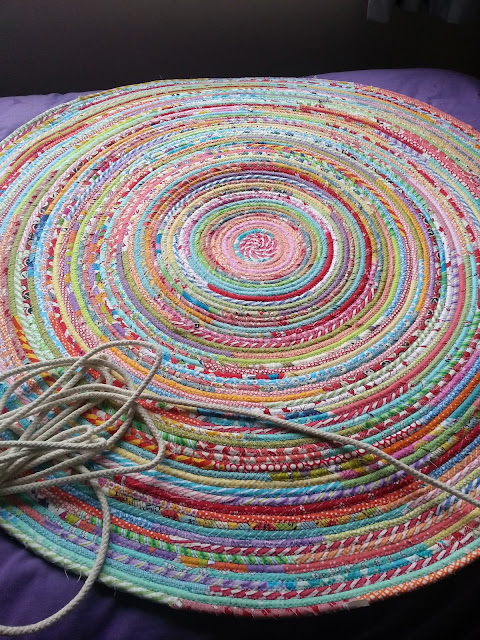
I started this rug as a bit of an experiment and with no plan to create a tutorial so please forgive me if the photos are a little cobbled together.
OK guys, now this is more of a marathon than a sprint (although it is super quick) so I think we need to organise ourselves before we start. Why ? because of course I jumped in feet first and fluffed up a few things and could have done them better so you guys get the benefit of my experience.
OK guys, now this is more of a marathon than a sprint (although it is super quick) so I think we need to organise ourselves before we start. Why ? because of course I jumped in feet first and fluffed up a few things and could have done them better so you guys get the benefit of my experience.
You will need :
- Cotton sashing cord: I started with 8mm and had to really squeeze it under my presser foot. Once I ran out of 8mm I had to use 7mm - and it was much easier. You may need to see what your own machine is happy to cope with. My finished rug measures approx 47 inches across and I used 125 metres (almost 400 feet) of cotton sashing.
- Fabric strips: Any length x 1 1/4 inches wide. (Depending on my mood, I ripped some and cut some.) My strips varied between 1 and 2 inches but I found the narrower ones easiest to wrap. I have no idea how much fabric I used but my scraps are once more actually fitting in the scrap basket.
- Polyester Thread : Lots of thread - more thread than you can imagine. It is a good idea to pre-wind a stack of bobbins as well, because once you get started you are going to want to keep on going - it is highly addictive!
- Jeans needle: I started with a regular needle and broke one before commonsense kicked in and I switched to a jeans needle.
Set Up:
OK guys, this is the secret to success. You need to be able to sew somewhere that your machine will be at the same level as a flat surface roughly the size of the rug you want to make. You cannot fudge this step or you will end up making a basket.
I started by putting the weird little plastic table on my sewing machine (I have never used it) but in the early stages the rug grows so quickly that it outgrew that little table in no time.
In the end, my kitchen table, butted up against the kitchen bench (With the Guinness book of records under my machine to raise it) was the perfect workstation. There is a box, also on a book behind my machine and once the rug got wider than this arrangement I put chairs next to the bench. Yep, home beautiful all the way.
You really need to be able to sort this out, if you don't have a flat surface it is impossible to keep your rug flat.
Machine settings:
I set my machine at the widest zigzag stitch possible and the stitch length at roughly the midpoint of what my machine offers.
Getting started:
Simply wrap one of the strips around the end of your sashing, making sure you have covered the end.
If you look closely you can see, not only the zigzag stitch but also a straight stitch running the length of the cord. I began by stitching the length of the cord after I had wrapped it. I soon realised this was double handling and it wasn't really needed.
Wind your covered sashing into a circle and sew. It could not be simpler.
Joining:
Joining:
Simply tuck the next fabric strip into the one previous and keep wrapping.
You will most likely get little bits hanging out - it is no problem at all, they get hidden as you add the next row around the rug.
I began by sewing the ends of the sashing cord together but that meant taking the rug out of the machine each time. The sashing cord had tape on each end to stop fraying, so in the end I just taped them together - woohoo !! Easy !!
As the rug grows it is going to get heavier - a lot heavier ! It will then become harder for your machine to 'pull' the rug through. Once the rug became very large, I would sew about 20 cm and then pull the rug around, constantly readjusting it so I was doing the heavy work not the machine.
Tips: if you have a needle up/needle down function on your machine set it at needle up. Once your rug gets large and heavy and you start shoving it around a bit,you are less likely to break a needle if you leave it up.
Finishing:
I took this photo late at night so please excuse it.
I wrapped the end of the sashing in sticky tape (just one layer) and then cut it, tapering it to a kind of point. I covered the raw cut edge with a bit more tape and then wrapped it and sewed. A little spot of backtacking and the rug is done!
Note : My machine collected an amazing amount of lint during this project. I am not sure if it was the hours of sewing in one sitting, or something to do with the cotton sashing but it is worth your while to stop every few hours and remove the lint build up.


Wow this looking amazing Jodie. Think I need to give one of these a go, lots of scraps to use up here.
ReplyDeleteThanks for the tutorial
It is gorgeous Jodie! I loved watching it come together on Insta
ReplyDeleteThis is insanely good Jodie! Thank you so much for all the photographs and for being generous enough to share.
ReplyDeleteAck! It's gorgeous Jodie!!
ReplyDeleteI love it, but would probably wait to try it until I see how it survives a wash. Will you let us know when you do that? It looks great, and it looks like a fast way to put a real dent in the scrap bin. Thanks for the tutorial!
ReplyDeleteI make rope bowls like this (only much smaller!) and they have survived a wash. This is huge though......
DeleteI love it, but would probably wait to try it until I see how it survives a wash. Will you let us know when you do that? It looks great, and it looks like a fast way to put a real dent in the scrap bin. Thanks for the tutorial!
ReplyDeleteI love it, but would probably wait to try it until I see how it survives a wash. Will you let us know when you do that? It looks great, and it looks like a fast way to put a real dent in the scrap bin. Thanks for the tutorial!
ReplyDeletesure thing Juline, it is too big to go in my washing machine so I expect I will treat it like a regular rug. I will give it a bashing every now and again and then use a carpet shampoo when it is grotty. ( or just turn it over to the clean side at first)
DeleteThis looks so good!!! Loved watching your progress on IG. If / when it needs a wash - can you let us know how you do it and how the rug behaves? Thank so much for this tutorial too! xo
ReplyDeleteLovely stuff Jodie! Thanks for the tutorial it looks fantastic!
ReplyDeleteWow looks AWESOME! I can totally relate to the physical maneuvering involved, and the lint! I have been making bowls from rope - like you said, if you don't keep it flat it will become a basket!- for a rope bowl you have to sew the flat base, then hold it up at a 90 degree angle and keep sewing! Photos over at my blog this week. But really want to try adding some fabric scrap colour now!
ReplyDeleteHello Dianne, would you mind giving me the name of your Blog ? I would love to see your bowls. tIA
DeleteOMG,OMG,OMG it looks flippin amazing Jodie. I am feeling the urge and that hasn't happened for awhile, let me tell you!! Thanks for the easy tute.
ReplyDeletethat is a thing of amazing marvellousness, ness. you are a very practical, solution focussed, genius woman.
ReplyDeleteyou are also mad as a box of frogs.
we need that.
Exactly !
DeleteWell that is the bees' knees. How fabulous!! Now I want one too!!!!
ReplyDeleteThis is gorgeous!
ReplyDeleteIts beautiful, and just what every scarp enthusiast needs in their home!
ReplyDeleteWonderfull, thanks to share.
ReplyDeleteOoh! Think I might be going looking for sashing cord? I'm assuming Spotlight or Bunnings would have it? Why I am even thinking about it is beyond me as my husband thought my crocheted rag rug looked like we lived in Little House on the Prairie and I had to give it to my mother LOL
ReplyDeleteLooks fantastic Jodie - Happy Birthday to you.
ReplyDeleteIt looks fabulous!
ReplyDeleteIf you do a rectangular rug what is the procedure for the ends.
ReplyDeleteYou. Are. Brilliant!!!
ReplyDeleteQueen of Awesome-ness! Love the comment, mad as a box of frogs. With Abby's shedding problem from her thyroid problem I'd have a hairy rug problem. EEK! Great tutorial.
ReplyDeleteOMG thank you, that is a beautiful rug and you read my mind that I wanted to know how to make one!
ReplyDeleteSO going to try this!
ReplyDeleteSO going to try this!
ReplyDeleteAmazing. Thank you for the tutorial.
ReplyDeleteThat is way too pretty to put on the floor!
ReplyDeleteJust checking in to see how much cording you used - have sent husband on a search as he's got other hardware store errands. His eyeballs at hearing 400' were worth the request! Thank you for sharing your experience. My scrap storage is chockablock so really this project is a necessity for THIS MINUTE.
ReplyDeleteOh My Gosh, this is gorgeous..... can't wait to have a 'crack' at this!! Thank you.
ReplyDeleteI really want to make a rug! And I love yours! But I'm wondering how these clothesline rugs wash up. I really want new rugs that are washable.
ReplyDeleteIt's wondrous!!!
ReplyDeleteI wonder how tricky it would be to take odd ball shaped scraps and make a bigger piece of fabric with them then cut that into strips to make into rope bowls/rugs/coasters. Would all the seams make it to lumpy. . .damn, now I want to try this and find out.
ReplyDeleteAwesome and a great way to use up the scraps. Might have to give it a go!
ReplyDeleteThanks so much for this. I might get out the lazy susan to help the rug turn under my machine. Great tutorial, thanks heaps Jodie.
ReplyDeleteBeautiful! I think all your hints are very very useful. I would not want a bowl that size :)
ReplyDeleteThis rug is crazy awesome. I am going to the hardware store to find cording tomorrow. I NEED a rug like this in my kitchen. Thank you so much for showing how you did it.
ReplyDelete